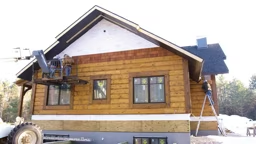
The most exciting part of buying your log home is seeing it progress from drawing board to reality. This can also be an anxious time. Frustration sometimes stems from seeing how quickly the logs go up — often in less than a week — but how slowly work proceeds from then on. The reason is that the logs are by far the home’s most substantial material and, once stacked, suggest the home is almost ready. Not so. Given the vagaries of the weather, scheduling and project complexity, a precise timeline is impossible to determine, but anywhere from six months to two years is usual. The average is 11 months.
Unless you intend being involved in your home’s construction, the details needn’t concern you. A basic understanding of the process, however, will help you track what’s going on.
From a construction standpoint, log homes aren’t that different from any custom-built home. Check out this timeline to figure out when you’ll be living in your new home:
1. Begin a Construction Schedule
Give notice to building permit office, financial institution, insurance agent, subcontractors and zoning boards.
See also: Expert Advice: Site Specs, Code Compliance and the Value of a Structural Engineer
2. Prepare the Site
Call excavation contractor to confirm work schedule, cut or grade entrance road or driveway, install culverts, spread crushed stone, clear building site and make a material storage area, dig a basement excavation, haul or store the dirt.
3. Make a Water Well
Call water well contractor to confirm work schedule and drill a water well.
4. Make a Septic System and Drain Field
Call septic contractor to confirm work schedule and install a septic tank and drainfield.
5. Install Temporary Utilities
Call contractors and utilities to confirm work schedule, install temporary toilet facilities, install temporary electricity, call for inspections as needed.
6. Dig Footings
Locate and dig footings and pier pads, install access pipe for under-foundation utilities.
7. Call for Pest Protection
Apply pest protection chemicals.
8. Pour a Foundation
Install forms for poured concrete foundation, call for foundation inspection, pour concrete foundation, and install waterproofing or insulation.
9. Install a Subfloor
Install subfloor, beams, posts as required.
10. Backfill and Rough Grade
Backfill around foundation and rough grade a slope for a lawn.
11. The Log Home Package is Delivered
Confirm amount of final payment for logs, confirm amount due for delivery charges, arrange to have certified checks available, prepare material storage area, and assemble equipment/manpower to unload logs.
See also: A Primer on Log Home Packages
12. Unload and Store the Logs and Materials
Unload materials and protect per instructions, and check the materials against shipping manifest.
13. Weathertight the Log Shell and Interior Partitions
Erect log walls following construction manual, install windows and doors per plan, erect interior wall partitions, and install roof system and sheathing.
14. Finish the Roof
Install roofing felt, flashing and shingles. See also: Choosing a Log Home Roof
15. Erect the Fireplace and Chimney
This step varies if you are installing a pre-fabricated fireplace or wood stove.
16. Install Plumbing
Install rough plumbing system and call for a plumbing inspection.
17. Install Heating, Ventilation and Air Conditioning (HVAC)
Install rough HVAC ductwork and equipment and call for a mechanical inspection.
18. Electrical
Install rough electrical wiring and service panel and call for an electrical inspection.
19. Call for a Framing Inspection
20. Pour Interior and Exterior Concrete
Pour concrete floors, driveways and walkways.
21. Install Ceiling Insulation
22. Install Wall Insulation and Soundproofing
23. Install Interior Walls and Ceilings
Install gypsum wallboard and tape.
24. Paint, Stain and Add Wallcoverings
Apply interior paint, stain, wallcoverings, apply exterior paint, stain, preservatives, and apply interior and exterior chinking and caulking.
25. Finish Floor Coverings
Install hardwood flooring, install resilient or ceramic tile, install padding and carpet.
26. Install Interior Finish and Trim
Install interior doors and hardware, interior window and door trim, baseboard base and shoe, wall moldings, chair rails, cabinets and countertops, vanities, bars, soap dishes, mirrors, closet shelves, poles, hardware, stair treads, railings, balusters, medicine cabinets, tub and shower doors, rods, etc.
27. Finish Plumbing
Install plumbing fixtures and appliances and call for final inspection.
28. Finish HVAC
Install final HVAC equipment and test and call for a final inspection.
29. Finish Electrical
Install fixtures, appliances, outlet covers, etc., and call for a final inspection.
See also: How to Plan Your New Log or Timber Home's Electrical Needs
30. Exterior Finish and Trim
Install window and door trim, install fascia, frieze and rake boards, soffit and porch ceilings, porch posts and railings, gable louvers, soffit vents, garage door and door opener, and gutters and downspouts.
31. Add Landscaping
Finish grading, seeding, sodding and shrubbery.
32. Final Building Inspection
Inspect work of subcontractors and make punch list, review punch list (deficiencies) with contractors, re-inspect building after corrections and accept work, obtain lien waivers and approve final payment, call for final building inspection, obtain an occupancy permit, notify financial institution and insurance company of completion, switch insurance to homeowners policy, and notify any other agencies of completion.
33. MOVE IN DAY!
Learn more about the entire log home planning process here!


