
Create log home longevity and make your log home last for generations with these maintenance tips that address areas like design, landscape and drainage.
Good Log Home Site Design
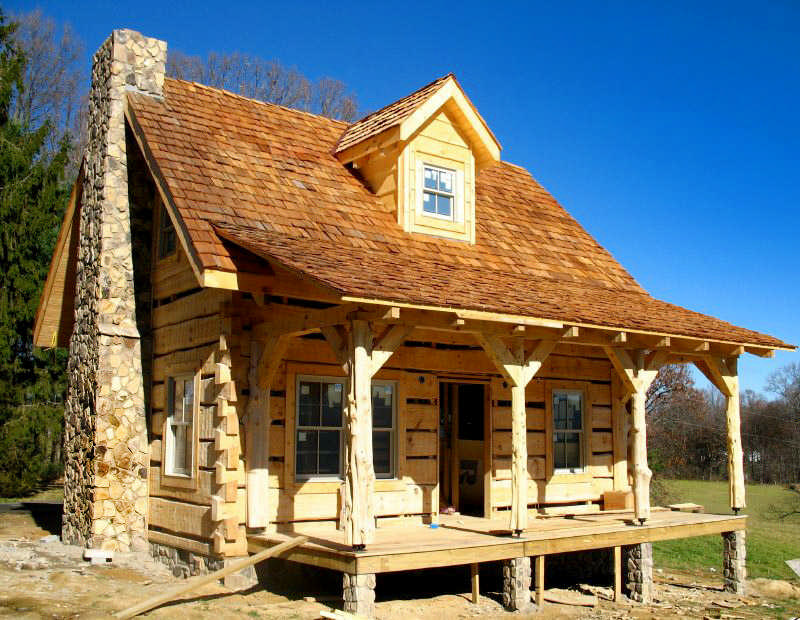
1. If you haven't built your log home, you can help or hinder maintenance issues with smart design. Start by raising the home's foundation at least 6 inches above the ground (some experts recommend as much as 24 inches in insect-prone areas).2. Use generous roof overhangs (also known as eaves) in your design to protect log walls and roof timbers against the elements.
3. Move water runoff away from your home by getting builder or general contractor recommendations on the best gutters and downspouts.
4. To resist water and insect damage, don't allow any log floor or wall materials to be exposed to the ground. Use inorganic materials, such as rock, within 12 to 24 inches of the first course of logs.
5. Never use wood mulch, pine straw or other ground covers, which will encourage termites and other insects.
6. To ensure consistency for the life of your home, keep a maintenance diary to track any problems and your solutions.
Smart Log Home Landscaping
7. Clear all stumps and fallen trees within 50 feet of your home, since these can harbor wood-boring insects and a variety of pests.8. Watch for tree branches that can be a bridge to your home for nesting insects.
9. When planting, keep shrubbery a minimum of 3 to 5 feet from the walls of your home. The goal is to enable air to circulate freely around the home to help dry the logs after it rains or snows.
Proper Log Home Drainage
10. To stop water runoff, make sure the grading around your foundation slopes away from the home—usually a minimum of 6 inches in the first 6 feet away from the foundation.11. Even if your builder sloped the soil during construction, this grading can settle and become flat or even slope toward your home. Don't use topsoil to increase the slope of the grade, which will only act as a sponge. Use rock or gravel instead, which will shed water.
12. Make sure your downspouts or splash blocks divert rainwater at least 6 to 9 feet away from the home.
13. Install a French drain to keep water hazards away from your home. These flexible pipes—set into trenches filled with gravel—draw in moisture from the surrounding soil and channel it away.
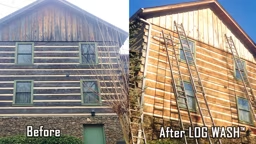
Sealing New Log Homes
14. Remove mill glaze, road grime and job-site dirt from the logs. You can do this by using a log-wash solution, sanding, power-washing or corn-blasting, depending on the condition of your logs.15. If you elect to wash your logs with a cleaning solution, always remember to apply cleaners from the bottom of the walls upward, then rinse from the top down. Always make sure to thoroughly rinse the cleaning solution off the walls. Follow manufacturer's directions.
16. After waiting for the logs to dry, apply a borate preservative and allow to dry. Next, apply your interior and exterior stains. Final step: Apply external sealants if your house requires them.
17. All log homes will need some caulking—regardless of the log profile or construction style—in between log courses, at corners and around windows and doors. The sealant or chinking you use must be compatible with whatever stain you apply to your home. Not sure? Call the manufacturer.
Saving Your Log Home from Insects
18. If you see signs of termites, call a pro. Indicators of a problem include frass (a sawdust-like substance) and tunnels in the wood.19. If carpenter bees or carpenter ants have set up shop in your home, locate and destroy their nest with an insecticide and fill holes with caulk.
Protecting Log Home Roofs & Exposed Timbers
20. Inspect flashing in the valleys of the roof, around the chimney and enclosing plumbing vents to ensure a tight seal against water. Use roof tar to seal edges that have lifted up.21. If you have exposed timbers on the underside of your eaves that extend flush with the overhang or protrude past it, the ends of these logs are susceptible to rot. Check and reseal annually.