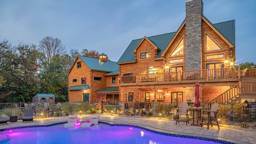
Photo Credit: fotolia.com/lofik
Building a log home is an exciting prospect. It also can feel like a formidable challenge. But, once you understand the sequence of events, the process is far less intimidating and easier to manage. Use this section as your map through the winding road that is custom log home construction.
Construction Prep
Preparing to build a log home can take anywhere from several months to a few years. Finding the perfect location, choosing a log home provider and a floor plan, estimating costs, arranging contractors and securing financing are all grouped into what professional builders call “pre-construction activities.” Although thorough planning during the pre-construction phase paves the way for a smooth build, the real excitement begins the day you break ground and start turning your log home dream into a reality.Site Preparation
Although log homes can be built almost anywhere, most log home enthusiasts favor the privacy of rural locations. So, construction often begins with basic site prep, including clearing the land, constructing an entrance road and installing well and septic systems.Well
Depending on depth and ground conditions, drilling a well can take anywhere from a few hours to several days. The actual water line connecting the well to the house will be installed after the foundation is in.Septic System
Just as many log homes rely on wells for water, they also need septic systems to dispose of waste. Septic systems generally consist of a tank and tile or perforated pipe to carry wastewater from the tank into a septic field consisting of a series of trenches or pits. There, the water seeps back into the ground to be filtered by soil particles and purified by microorganisms. Because geology and soil conditions are important to the efficiency of a septic system and the purity of water returning to the soil, they are often closely monitored by local health departments. In most areas, health regulations require that licensed subcontractors install the septic systems.Though the septic system, itself, may not be installed until later in the process, the location of the tank and field should be marked before construction begins.
Utilities & Site Necessities
It’s always a good idea to have electrical service available once construction starts. Forcing your builder to use a generator for power slows construction and is usually more costly. In many areas, the utility company runs phone lines along with electric lines, making this an opportunity to arrange for phone service. The electrical subs can provide a temporary service head with a circuit breaker box and phone jack. Once the house is dried in, the service panel will be moved to its final location. It’s also time to bring in a portable toilet for the crew and prepare temporary storage for construction materials and tools.Breaking Ground
Excavation
Once the building site is prepared, the builder lays out the foundation and marks the excavation area. These markers guide the excavator, who scoops out a rough pit that will hold the foundation. If the house will rest on a concrete slab or crawl space, excavation may be nothing more than a trench dug with a backhoe to hold the footings.Footings
Footings are a solid base of concrete or stone that support the foundation and ultimately the whole house. Regulations (and good sense) require that the footings rest on solid soil. The base of the footing must be below the frost line, which varies with region. Local building codes specify this depth, ensuring that the footings will not be influenced by the expansion and contraction that results from soil freezing and thawing.Foundation
Log home foundations vary as much as the homes themselves. The most popular foundations are poured concrete and masonry block, although some home builders recommend pre-cast concrete panels and insulated concrete forms (ICFs) as alternatives.With a poured-wall foundation, the contractor erects forms into which concrete is poured. When the concrete is dry, the forms are stripped away. The entire process typically takes three to five days. With ICFs, the forms stay in place after the concrete cures and act as extra insulation for the foundation. Block walls require the services of a mason, who lays several courses of block over a period of days to weeks. The mortar must be completely dry before construction can begin.
Contrary to common belief, few log homes require a “heavy-duty” or special foundation to support their load
Drainage and Waterproofing
Good drainage is the key to a dry basement. Most building codes call for drainage tile or perforated pipe to be laid around the footings or base of the foundation wall. If the topography of the building site doesn’t allow this pipe to drain at the surface away from the house, the pipe is directed into a sump crock in the basement floor where an automatic sump pump carries water out and away from the house. Foundation walls are protected with a waterproof coating and sometimes with a layer of rigid insulation.
Plumbing Groundwork
Unless the plumbing for the house will exit above the foundation, the plumber usually makes his first appearance during foundation construction. Before footings are poured, the plumber may place a piece of pipe, or “sleeve,” in the footing trench where pipes for water and septic will cross. This prevents having to tunnel under footings or break through walls later. After the foundation walls are poured but before the slab, the plumber installs drainpipes or water lines that will lie beneath it.Fireplaces and Chimneys
If plans call for a stone or masonry fireplace, the foundation contractor usually digs and pours a footing and supporting walls for the chimney as part of foundation construction. Masons will build the fireplace and chimney as the log shell is being completed. If the home includes a “zero-clearance” fireplace — a metal unit set into a framed chimney — no extra footings or support walls are required.Backfill
Once the foundation is completed and drainage and waterproofing measures are installed, the excavator returns to backfill and rough grade, piling soil around the outside of the foundation to a level slightly higher than the final surface (to allow for settling) and grading the surface so water drains away from the foundation. Builders often add additional bracing to foundation walls or wait to backfill until after the subfloor is complete.Subfloor
The subfloor of a log home is usually no different from a conventional home. Floor joists are laid over a system of girders and support posts. Decking of plywood or oriented strand board (OSB) is secured on top of the joists. Floor trusses provide an alternative to joists and allow greater spans reducing the number of support posts needed.Erecting the Log Shell
Delivery
Delivery day marks a high point for new log home owners. As the 18-wheelers bearing logs, beams and assorted other materials snake up the entrance road, it means that someone’s dream is finally coming true.Careful planning for delivery day can ensure that the mood isn’t spoiled. Good builders confirm, in advance, that the delivery trucks can navigate the entrance road. Steep slopes are less of a problem than sharp turns. Inability to turn an 80-foot-long rig around at the building site may mean last-minute changes to your off-loading plans. The fewer surprises you have on delivery day, the better.
It’s wise to have a staging area where materials will go when removed from the trucks. Generally, logs and materials used earlier in construction should be placed closer to the foundation, preferably on the high side of sloping sites. Lugging logs and lumber uphill not only aggravates workers, but also takes valuable time away from construction. Having the construction crew or carpenters unload the trucks can help ensure that materials are stored efficiently and workers get a head start on knowing where to find things.
Log Walls
Log work begins by laying out the first course of logs on the subfloor. Builders often take this opportunity to mark the location of electrical outlets, switches, windows, doors and partition walls. This is the beginning of turning paper plans into reality, and sometimes minor onsite adjustments may need to be made.Actual log work varies with the type of system being used. Milled, pre-cut logs are usually stacked and secured in segments, moving around the house so that wall heights remain fairly even as walls go up. It’s especially important to make sure log walls stay plumb (vertical) and corners remain square. Good builders check plumb frequently using a level or plumb bob. Comparing distances between diagonally opposite corners quickly reveals when corners are slipping out of square.
Log homes built with large logs, such as handcrafted homes, often require the use of a crane for the heavy lifting. If much of the log preparation has already taken place at the manufacturer’s plant or the handcrafter’s yard, then large, pre-fit, full-length log wall systems can be erected quickly, sometimes in only a few days.
Whether the home is milled or handcrafted, many systems require construction methods that allow for the settlement that occurs as a result of log shrinkage. Space left at the top of window and door openings allows units to operate freely as log walls settle. Posts placed on adjustable jacks that can be lowered to match any change in log wall height may support second-floor and roof systems. Interior partitions may be framed to include a space that will allow for log settling, too.
While the thought of changing wall height causes concern for some people, settlement is a normal part of a horizontal log system and presents no problems as long as proper construction methods are used.
Insulated Log Systems.
Not all log walls are made from solid logs. Some log home companies offer an insulated-log alternative. These log homes use half-logs applied over conventional framing. While they look like a solid log home from either inside or out (unless the homeowner chooses to use another type of wall covering in some areas), the core of the wall is similar to a conventionally framed house. In insulated-log homes, builders may wait to apply the half logs until the roof is on.
Second-Floor Systems
After the log walls are erected, the crew moves to either the roof (on one-story houses) or to the second-floor system. The second floor may be framed conventionally using dimensional-lumber joists and plywood decking, or it may consist of exposed square or round beams covered with 2-inch-thick decking. After setting the exposed beams, carpenters often use the roof sheathing as a temporary second floor while they frame the roof, passing the sheathing up to the roof when framing is complete. Then they can install the second-floor decking under cover of the roof.Roof Systems
Log homes use a variety of roof systems. The simplest are conventionally framed roofs, just as in other types of homes.Framing a conventional roof begins with setting the ridge beam and rafters. Carpenters cover the rafters with plywood or OSB sheathing and tarpaper. Roofers then apply the final roof covering — shingles, metal, wood shakes or tile. Later, insulation will fill the spaces between the rafters. In cathedral-ceiling areas, coverings are secured to the rafter bottoms. For flat-ceiling areas, ceiling joists are added. Insulation is added above ceiling joists after the ceiling coverings are installed.
Many log home buyers choose the distinctive look of exposed-beam ceilings, which requires different construction methods.
A log or heavy-timber roof system begins with placement of the log rafters or purlins. (Rafters run from the top of the log wall to the ridge while purlins run parallel to the log wall.) Wooden decking is secured over the large timbers and a vapor barrier secured to the decking. Rigid insulation placed on top of the vapor barrier is covered with sheathing followed by tarpaper and a final roof covering.
Interior Framing
Interior partition framing in a log home is similar to any other type of home. Some builders attach partition framing to logs using “slip” connections — nails or screws driven into the logs through slots in the framing. The slots prevent fasteners from interfering with log settlement.In some systems, interior partitions are framed to include a space below the ceiling. This, too, will prevent framing from interfering with settlement adjustments. The settling space will be concealed behind trim after interior wall coverings are added.
Because tub and shower enclosures won’t pass through openings in the framing, the builder or plumber makes sure these units are on hand as framing starts. Carpenters secure them in their final position as they complete the framing.
See also The App That Will Keep You on Budget
Sealing the Exterior
To prevent weathering and eventual deterioration, exposed wood in logs and trim should be protected with a wood preservative. Preservatives specially formulated for log homes are readily available and offer long-lasting protection. For the best results, the preservative should contain a pigment that blocks ultraviolet rays from the sun. Clear preservatives offer no UV protection, which can lead to premature weathering of the wood.Preservative application is easiest before window and doors are installed. Openings can be covered with plastic to prevent chemicals from blowing inside and staining walls. If the system needs caulking, this may be applied before the preservative to ensure a good bond with the wood. Chinking is often applied after the preservative to maintain the purity of its contrasting color.
Doors and Windows
Once the roof is covered to protect the interior and the exterior is sealed, carpenters install doors and windows to provide a complete weather-tight shell. Often homeowners save time and money by pre-finishing door and window units while the log shell is being built.Mechanical Systems
Together, plumbing, heating and cooling are referred to as the mechanical systems. Subcontractors, who may be individually licensed for their particular trade, usually install these. Mechanical work is divided into two parts: “rough-in,” which takes place before wall framing is concealed behind coverings, and “finish,” which takes place near the end of construction.
Plumbing
The plumber usually arrives first because the location of pipes is the most restricted. The plumber installs all pipes that will be concealed within walls and hooks up the tubs and showers that were placed during framing. He may also connect the well and septic to the house at this point and place the reservoir tank. After all the pipe runs are complete, the plumber pressurizes the pipes with air to test for leaks. Finally, he calls for a rough-in inspection of the work.Heating, Ventilating and Air Conditioning (HVAC)
To reduce possible conflicts between pipe and duct placement, good builders usually make sure the HVAC contractor and plumber know each other’s needs before rough-in begins. While the plumber is busy, the HVAC subcontractor may be measuring for ducts. Ductwork is often fabricated at the subcontractor’s workshop and then carried to the job site for installation as soon as the plumber finishes roughing in pipe work. Sometimes the heating and cooling units are installed now.Electrical
The electrician is usually last on the scene. It’s easier to snake wires around pipes and ducts than the reverse. The electrician places outlet and switch boxes and strings wire back to the power source, usually in the basement, garage or utility closet. He may also transfer the temporary electric service, located outside, to its final location. As with the plumber, the electrician finishes by calling for an electrical inspection.Rough-In Inspection (Close-In)
Following completion of all mechanical rough-ins, the builder calls for a framing inspection. The building inspector first makes sure all necessary mechanical inspections have been passed. Then he examines framing to be sure that proper construction methods were followed and that mechanical subcontractors didn’t inadvertently affect the structural stability of the framework in installing their pipes, ducts and wiring.Interior Wall Finish
An approved framing inspection lets the builder start “closing-in” the framing with the final wall coverings. On log homes, these are usually drywall or tongue-and-groove pine or cedar boards.Drywall
Drywall is the least expensive and most popular wall covering. Installation consists of two steps: hanging and finishing. Drywall hangers quickly cover large areas of the walls and ceiling, securing the drywall sheets with nails or screws. Finishers follow, taping and concealing joints with drywall compound. After joints are sanded, the walls are ready for the painter.Paint & Stain
Painters usually follow wall-covering subs. Arriving before the trim carpenters lets them move faster, covering large areas quickly with spray guns or rollers. Walls get a prime coat, followed by one or two topcoats. Wood tongue-and-groove gets varnish or oil. The builder may also have painters apply finish to trim before it is installed to allow sealing the backs of trim pieces and speeding installation.Exterior Finishing
While the painters are busy inside, carpenters finish outside porches and decks. Once all outside work has been finished, the excavator returns one last time for final grading, spreading topsoil and preparing the site for landscaping. Installers add gutters and downspouts to catch and carry away rainwater.Cabinets & Floors
Floor Coverings
As soon as painters finish the kitchen and bath areas, they are turned over to flooring subcontractors, who install tile, stone or wood floor coverings. Because a lot of construction activity remains, carpets are the last floor coverings to go down.
See also Log Home Additions: How to Add On
Cabinetry
As soon as kitchen and bath wall coverings have been finished and floor coverings installed, cabinet installers set to work in kitchen and baths. Cabinet installation in a log home is no different from a conventional home — unless plans call for cabinets on settling log walls. In such cases, cabinets may be secured to vertical furring strips that won’t settle with the logs. In exposed areas, furring strips are covered with a tongue-and-groove or tile backsplash. In baths, installers set vanities and medicine cabinets.Fixtures & Appliances
It’s time for mechanical subcontractors to re-appear. The electrician installs switches and outlets into roughed-in boxes and sets light switches and appliances. The HVAC sub brings register covers and finishes any remaining connections. The plumber connects the septic line, installs toilets and sinks and hooks up the dishwasher.Interior Trim
While mechanical subcontractors complete their work, trim carpenters are applying finish trim to doors and windows. If the permanent stairs haven’t been installed yet, they remove temporary stairs and build or set the final staircase. They also set door hardware, baseboards and any special moldings and trimwork.Final Floor Coverings
Finally, the trim carpenters and mechanical subs wrap up, leaving the log home finished except for areas of bare subfloor. These quickly disappear as flooring installers complete the last step, leaving a completely finished log home ready for final inspection.Wrapping Up
The final building inspection and “walk-through” with the new owners mark the end of construction, involving 50 or more workers from several dozen construction businesses and trades. Months (or years) of planning and dreaming now stand ready to be seen, admired and enjoyed.